Django makes it easy to quickly spin up APIs and provides a great admin interface and command line management tools. It certainly speeds up the development of any CRUD system.
However, as your project grows, you will want to make sure your code is well-documented, both for your backend developers and front-end clients that consume your API.
In this blog post I will outline how to use Python 3.7 dataclasses to write type-annotated and documented code and OpenAPI (Swagger) to automatically document your API.
About dataclasses
The dataclass decorator, added in Python 3.7 provides some advantages when used in classes:
- creates classes that provide automatic
__init__()and__repr()__methods - allows you to specify class attributes and their types using type annotation syntax
- attributes and their types are discoverable programmatically, allowing other modules to use them as more than just syntactic syntax, for example for validation.
In this blog post I will be showing how dataclasses can be used for django rest framework serializers using djangorestframework-dataclasses. This allows you to define classes to use in your application and also have them serialized for Django input and output.
About OpenAPI
OpenApi (or Swagger) allows you to document your API using JSON. It also provides a front-end where people consuming your API can see the API documentation and try calls on the fly.
Installing OpenAPI support for DRF
For the OpenAPI renderer, pyyaml and uritemplate are required for generating the API yaml documentation:
pip install pyyaml uritemplateOnce the dependencies are installed, you can automatically generate your swagger documentation by including two routes.
Firstly, to generate the yaml that will be used by openapi, call get_schema_view to get the DRF view for use in your urls.py:
from rest_framework.schemas import get_schema_view

urlpatterns += [
   url(r'^openapi-schema', get_schema_view(
        title="Tutorial app",  # Title of your app
        description="tutorial app",  # Description of your app
        version="1.0.0",
        public=True,
    ), name='openapi-schema'),
]
This will expose the schema yaml in the /open-api route. The schema will be automatically updated from your routes and serializers, and list all the URLs and their inputs and outputs.
Use the following request to check it out:
curl -HContent-Type:application/json http://localhost:8000/openapi-schema/ # mind the content-type
# Response:
openapi: 3.0.2
info:
  title: Tutorial app
  version: 1.0.0
  description: tutorial app
paths:
  /hello/hello/:
    get:
      operationId: helloPerson
      description: ''
      parameters: []
      responses:
        '200':
          content:
            application/json:
              schema:
                properties:
                  name:
                    type: string
                  age:
                    type: integer
                required:
                - name
                - age
          description: ''
Once the schema is generated, you can add Swagger UI to your API.
In order to do that, you can set up a static HTML page and load the scripts from a CDN, then render it as a template.
The HTML page, copied from the DRF documentation, is as follows:
<!DOCTYPE html>
<html>
  <head>
    <title>Swagger</title>
    <meta charset="utf-8"/>
    <meta name="viewport" content="width=device-width, initial-scale=1">
    <link rel="stylesheet" type="text/css" href="//unpkg.com/swagger-ui-dist@3/swagger-ui.css" />
  </head>
  <body>
    <div id="swagger-ui"></div>
    <script src="//unpkg.com/swagger-ui-dist@3/swagger-ui-bundle.js"></script>
    <script>
    const ui = SwaggerUIBundle({
        url: "{% url schema_url %}",
        dom_id: '#swagger-ui',
        presets: [
          SwaggerUIBundle.presets.apis,
          SwaggerUIBundle.SwaggerUIStandalonePreset
        ],
        layout: "BaseLayout"
      })
    </script>
  </body>
</html>
SwaggerUIBundle will automatically generate your UI, you don’t need to do anything else. The only interesting value here is schema_url, which should point to your schema URL defined above.
You can then load this template by adding the following to your urlpatterns:
url(r'docs/', TemplateView.as_view(
    template_name='swagger-ui.html',
    extra_context={'schema_url': 'openapi-schema'}
), name='swagger-ui'),
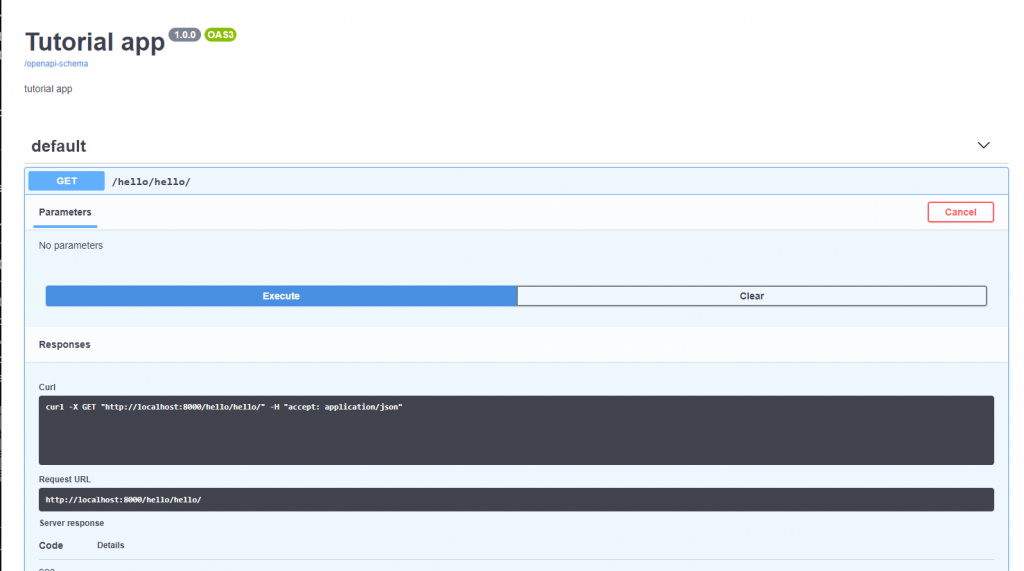
Load the /docs/ route in your browser. If everything has been configured correctly, you should see the Swagger UI.
The Swagger UI allows you to see all of your API’s routes and parameters required, and even try API calls on the fly!

Installing the Dataclass serializer for DRF
As mentioned earlier, dataclass serializer allow you to convert python dataclasses to JSON and vice-versa, offering validation on user data.
Consider the following dataclass:
@dataclass
class Person():
  name: str
  age: int
Your users can submit JSON data with the name and age properties, and djangorestframework-dataclass will validate the data and deserialize into a Person object that you can directly use in your domain methods.
To install the module:
pip install djangorestframework-dataclassesAfter installation, all you have to do to write your serializer is to inherit from DataclassSerializer and set the dataclass meta property.
class PersonSerializer(DataclassSerializer):
    class Meta:
        dataclass = Person
You can now use PersonSerializer in your API as normal.
from django.http import JsonResponse
from rest_framework.decorators import action
from rest_framework.viewsets import GenericViewSet

from tutorial.serializers import Person, PersonSerializer


class PersonViewSet(GenericViewSet):
    serializer_class = PersonSerializer

    @action(detail=False, methods=['post'])
    def get_age(self, request):
        person_serializer = PersonSerializer(data=request.data)

        if (not person_serializer.is_valid()):
            return JsonResponse(person_serializer.errors)

        person: Person = person_serializer.validated_data # will return a Person object

        return JsonResponse({'age': person.age})
person_serializer.validated_data will return an object of the Person class. This allows you to use your dataclasses as you want throughout your application.
What is more, the swagger documentation we implemented earlier allows you to see the input and output format for your person objects, provided by your serializers.

Click “try it out” to submit a person object with any values:

Once data is submitted, you can see the server response, allowing you to easily test and debug your API.

Conclusion
In conclusion, Swagger UI is a powerful documentation tool that can automatically generate documentation for any Django-Rest-Framework API. You can use it with any type of DRF serializer (such as ModelSerializer), but if you are wanting to use dataclasses and types for documentation, dataclass-serializer gives you an extra advantage: your code is documented not only for your frontend consumers but also for your backend developers
